
Scalable Vector Graphics (SVGs) are incredibly useful if you are designing and developing for multiple, uniquely sized device screens. Rather than defining the pixels within an image, an SVG defines the lines, curves, colors, and opacities that should be used to draw an image. In this way, an SVG will appear crisp and un-distorted regardless of the available space.
This is not the only benefit of SVGs, though. Because each separate piece of an SVG is defined by coordinate-like values, you can handle interaction with each piece separately. For example, you could create a map where each country can be selected and highlighted. Or you could hide the parts of an image that a user taps on. If you have the right image, the possibilities are extensive.
In this article, I’m going to explain how you can create and interact with an SVG image in Flutter using an example from my fitness app, FitJo.
Setup
Dependencies
This example requires two dependencies:
Software
- You’re going to need an SVG editor. Inkscape is my personal favorite since it’s pretty straightforward to use.
- You’ll also need a text editor like Notepad++ to examine the paths within your SVGs.
Create the SVG
The first step in the process is to find or create the image you want to use. It can be a PNG, JPG, or really anything else. The key is to find an image that has distinct shapes that can be easily separated. If the background is too fuzzy, you’ll get a lot of noise in your SVG and it’ll be a pain to identify the objects you want to keep.
Once you have the image, you can import it into Inkscape and start to manipulate it.
Load the Image
- “Import” an image that has a fairly strong resolution. This helps reduce noise when you convert the image to individual objects
- Select the image, click “Path”, then click “Trace Bitmap”
- Highlight all of the new bitmap, select “Path”, and then select “Break Apart”
At this point you should have an image wherein each piece is defined by its own path. We’re not done yet, though.
Resize the Image
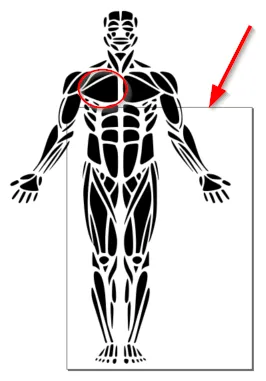
The box in the background defines the relative bounds that are used to define the path coordinates in the final SVG. In the example below, part of my image is outside of the box and will be drawn outside of my canvas when I move to Flutter. The starting position of the circled chest object is shown below.

At this point, you might think it’s fine to just resize the image so it fits into the box and be done. If we do that however, the values that define the path will need to be scaled so things fit on our device screen.
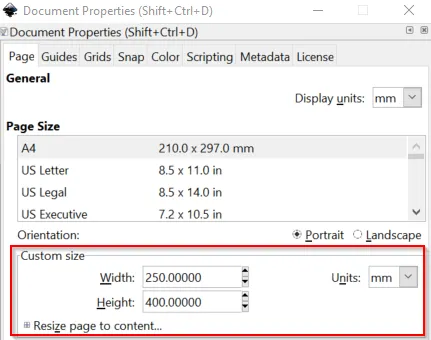
Instead, you should use the dimension fields at the top of the Inkscape interface to resize the image. Highlight all of the objects in your image and change the dimensions to something that will look good on screen. The units are irrelevant.

You’ll notice that resizing the image doesn’t do anything about the black box in the background so we’ll have to resize that next. Navigate to “File” -> “Document Properties” and then change the Page Size so that it has the same dimensions as your image (or so it’s slightly larger).
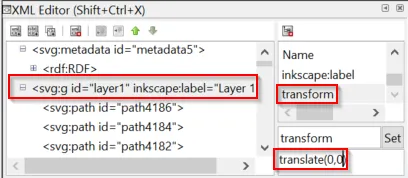
Everything looks good now, but there’s a secret transform that gets applied to the SVG when you save it, causing everything to be offset by some random value in the x and y directions. You can remove this transform following these steps:
- Go to “Edit” -> “XML Editor”
- Select your first layer in the top-left window
- On the right side, select the transform attribute
- Change it to translate(0,0)
- Press Ctrl + Enter to save the changes
Make sure your image is inside the box once more and then you can go to “File” and save the image as a plain SVG.
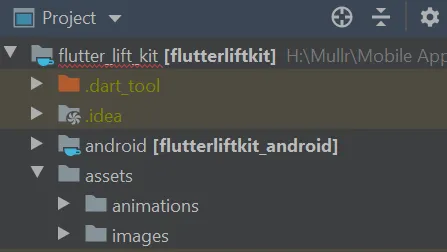
(Optional) You don’t actually need to upload the original image to your app but if you want to use it outright (without interactivity), you’ll need to add it to the “assets” folder in your app. To keep things organized, I added an “images” subfolder underneath “assets”.
After you’ve added it here, you need to add the path to the image to your pubspec.yaml file.
The PathPainter class looks like this:
class PathPainter extends CustomPainter {
  final BuildContext context;
  final State state;
  final bool front;

  PathPainter(this.context, this.state, this.front);
  @override
  void paint(Canvas canvas, Size size) {

    var myCanvas = TouchyCanvas(context, canvas);
    List<MuscleDraw> muscleList;

    Paint paint = Paint()
      ..style = PaintingStyle.fill
      ..strokeWidth = 8.0;

    // Scale each path to match canvas size
    var xScale = size.width / 250;
    var yScale = size.height / 400;
    final Matrix4 matrix4 = Matrix4.identity();

    matrix4.scale(xScale, yScale);

    muscleList.forEach((muscle) {
      Path path = parseSvgPathData(muscle.path);

      paint.color = Colors.black;
      if (global.primaryMuscles != null && global.primaryMuscles.contains(muscle.primaryName.toLowerCase())) {
        paint.color = Colors.blue;
      }

      if (global.detailedMuscles != null && global.detailedMuscles.contains(muscle.detailedName.toLowerCase())) {
        paint.color = Colors.blue[900];
      }

      if (global.secondaryMuscles != null && global.secondaryMuscles.contains(muscle.primaryName.toLowerCase())) {
        paint.color = Colors.blue[200];
      }

      if (global.selectedPrimaryMuscles.contains(muscle.primaryName)) {
        paint.color = Colors.red;
      }

      path.transform(matrix4.storage);

      myCanvas.drawPath(
        path.transform(matrix4.storage),
        paint,
        onTapDown: (details) {
          state.setState(() {
            if (!global.selectedPrimaryMuscles.contains(muscle.primaryName)) {
              global.selectedPrimaryMuscles.add(muscle.primaryName);
            } else {
              global.selectedPrimaryMuscles.remove(muscle.primaryName);
            }
          });

          log("${muscle.primaryName}");
        },
      );
    });
  }

  @override
  bool shouldRepaint(CustomPainter oldDelegate) => true;
}
We’re almost done but if you run this, you’d probably get an error because muscleList is not defined. That’s what we’ll do next.
In this example, muscleList represents all of the objects we want to draw to the canvas. Each item in the list should therefore contain a unique identifier, a String path, and optionally a Color. The class for each muscle in my example is here:
class MuscleDraw {
  String path;
  String diagramName; // Right vs left
  String primaryName;
  String detailedName;
  String groupName;
  Color color;

  MuscleDraw(this.diagramName, this.primaryName, this.detailedName, this.groupName, this.color, this.path);
}
The objects in my example required a few identifiers (diagramName, primaryName, detailedName, and groupName) since I was grouping them in various ways, but diagramName was the identifier that made each piece unique.
With the class set up, the next step is to create a list of these classes so that we can loop through them and draw them to the screen. Below I’m showing my list with just one item.
final List<MuscleDraw> muscleList = [
MuscleDraw("Right Fibularis Longus", "Legs", "Fibularis Longus", "Calves", Colors.black,
    "m 113.5554,375.08667 c -0.21339,-0.29201 -2.73764,-9.13202 -5.60946,-19.64441 -2.87183,-10.51243 -6.55437,-23.41403 -8.183467,-28.67024 -5.060658,-16.32815 -6.843875,-27.03017 -5.121382,-30.73604 0.783837,-1.6864 3.426194,-1.34663 5.366709,0.69007 4.37395,4.59072 6.80638,16.22272 7.8375,37.479 0.45098,9.29706 1.34125,18.35355 2.07525,21.11107 1.31659,4.9463 5.29811,17.33393 6.1837,19.23918 0.50514,1.08683 -1.7929,1.56588 -2.54885,0.53137 z"
  //"path4126"
),
...
]
The identifiers and colors are easy enough to add, but the path requires a few extra steps.
- pen Inkscape with your SVG image loaded. Right click on an object and select “Object Properties” to open the Object Properties window. You should be able to see the path# in both the ID and Label fields.
- In a separate window, open a text editor and load the SVG so that you can see the underlying XML.
- For each object in Inkscape, find the correlating path in the text file.
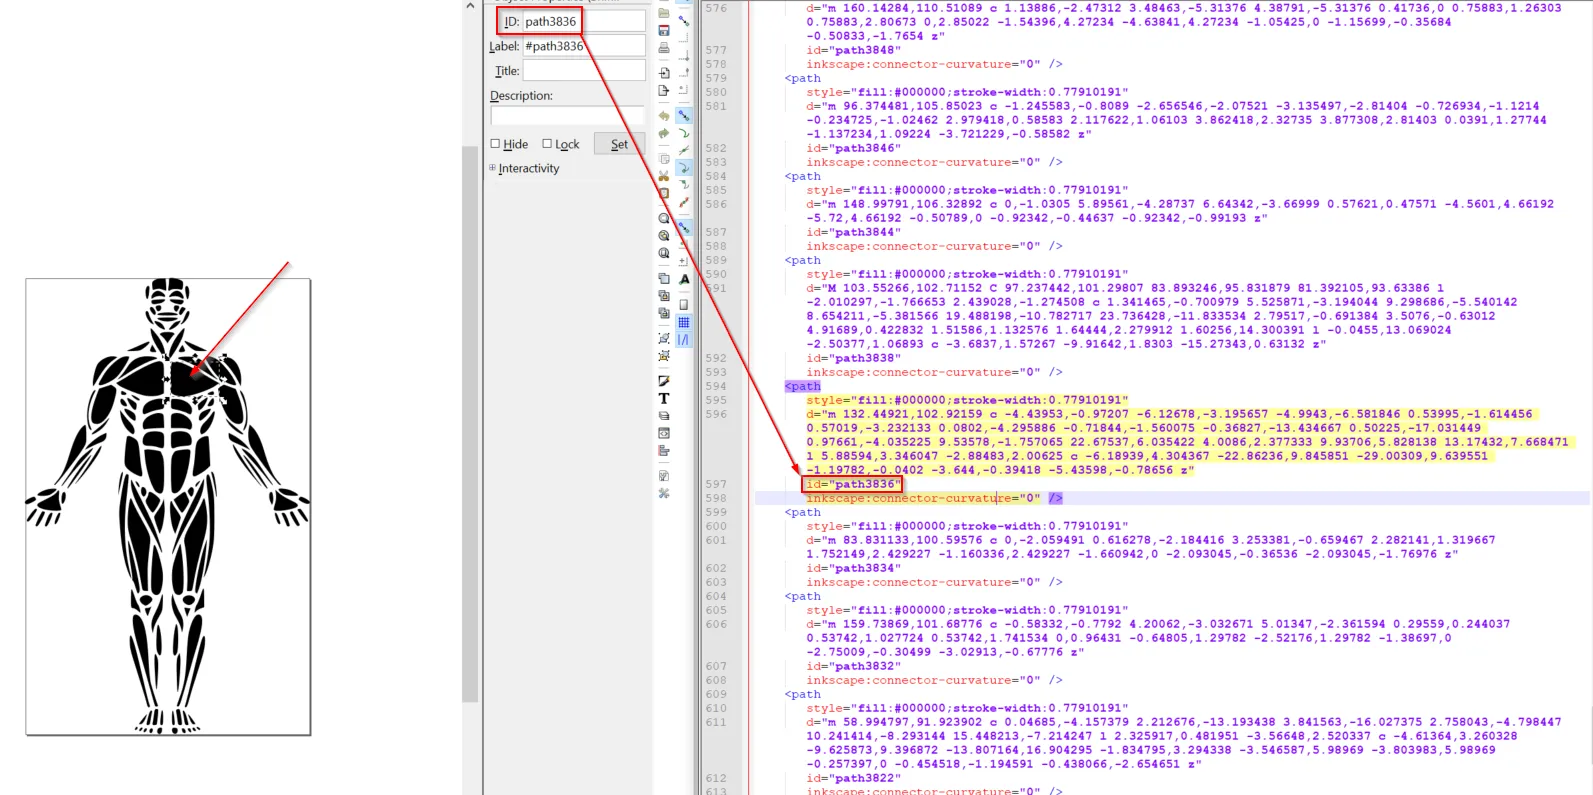
Once you’ve found the matching <path> tag, you can copy whatever comes after the d= and paste it into your object constructor in Flutter. Run the code again and start tapping on individual pieces.
Next Steps
At this point, each piece of the image should be responsive to single taps. Fortunately, the touchable package supports a whole load of other gestures including long presses, pans, and directional movements that you can experiment with.
In Flutter 1.20, the new Interactive Viewer widget was introduced which allows the user to scale and pan an image. At the moment, I haven’t been able to make TouchyCanvas work alongside this new widget but its on the list of things to do.
In Conclusion
Admittedly, this process can be slow and laborious, especially if you have a ton of small pieces, but the outcome is pretty cool looking. In my example, all I’m doing is checking if the object has been selected and changing the color of the paint that’s used to draw it. You could easily change other parameters inside the if statements to get different behaviors. I’ll be keeping this article updated so check back periodically!