
Contents
- Code
Code
Setup
Dart can be used to write command line apps. To get started, create a new CLI app using dart create and the “console” template:
dart create -t console my_cli
CLI apps have bin and lib directories, both of which are public.
- The
bindirectory contains your main() function and is the entry point for your CLI app - The
libdirectory contains your application’s Dart code which is imported into the bin directory
For the sake of this tutorial, I’ll ignore the lib directory and add all the code in a single file.
Run the App
A simple CLI app looks like this:
void main(List<String> arguments) {
  print('This is a CLI app!');
}
You can run it one of two ways. (1) Use dart run at the root of your project:
dart run bin/my_cli.dart
(2) Navigate into the bin folder and and use dart run with your specific dart file:
cd bin
dart run my_cli.dart
Pass in Arguments
You can pass arguments directly to your app by simply appending them to your run command:
dart run bin/my_cli.dart test one two
And then you can read the arguments just how you would expect:
void main(List<String> arguments) {
  print('This is a CLI app!');
  print('Arguments: $arguments'); // "Arguments: test one two"
  print('Arg length: ${arguments.length}'); // "Arg length: 3"
}
The issue with this approach is that all arguments are bundled into a single List<String> and its difficult to figure out what each argument means for the app. For insance, is the second argument an option flag (“-n”) or a value (“hello”)?
Enter the args package from the Dart team. This utility package “parses raw command-line arguments into a set of options and values” so you don’t have to do it yourself. Add the dependency to your pubspec.yaml:
dependencies:
  args: ^2.4.2
Then create an ArgParser object inside your main() function.
final ArgParser parser = ArgParser();
Without any other configuration, the parser isn’t too helpful. It will still “parse” the arguments if you ask it to but you’d basically be taking more steps to get the same List<String>:
void main(List<String> arguments) {

  final ArgParser parser = ArgParser();

  ArgResults argResults = parser.parse(arguments);

  for (var arg in argResults.arguments) {
    stdout.writeln(arg);
  }
}
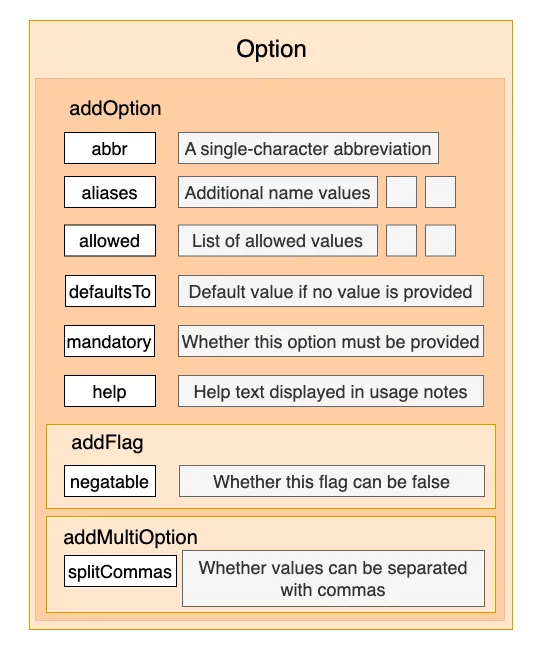
ArgParser’s true power is in its ability to look for specific types of inputs, or “options”. You can add Options to your ArgParser using the following methods:
- addOption: Adds a generic option
- addFlag: Adds a Boolean option
- addMultiOption: Adds an option that takes multiple values
Defining Options
Each option defines the name of the argument its looking for as well as abbreviations, aliases, help text, and default values, among other things.
Lets take a look at an example. Say we wanted our app to accept an argument called “name”. To do that, we would add an option to our parser…
void main(List<String> arguments) {
  final ArgParser parser = ArgParser()..addOption('name');

  ArgResults argResults = parser.parse(arguments);

  stdout.writeln('name: ' + argResults['name']);
}
…and pass a named argument in our command:
dart run bin/my_cli.dart --name joe
We can define an abbreviation and aliases so users don’t have to remember a single syntax:
void main(List<String> arguments) {
    final ArgParser parser = ArgParser()
    ..addOption(
      'name',
      abbr: 'n',
      aliases: ['title', 'label'],
    );

  ArgResults argResults = parser.parse(arguments);

  // Regardless of how many additional names you add,
  // you'll need to use the original 'name' to retrieve your value from the parser.
  stdout.writeln('name: ' + argResults['name']);
}
With this setup all of the following commands will work the same:
dart run bin/cotr_cli.dart --name joe
dart run bin/cotr_cli.dart --title joe
dart run bin/cotr_cli.dart --label joe
dart run bin/cotr_cli.dart -n joe
The default option added with addOption accepts a string argument. If you’d like for users to be able to input a true or false value, use the addFlag method instead.
void main(List<String> arguments) {
  final ArgParser parser = ArgParser()
    ..addFlag('uppercase', abbr: 'u');

  ArgResults argResults = parser.parse(arguments);
}
Including the flag in your command, using either the full name or abbreviation, will set it to true:
dart run bin/cotr_cli.dart -u

dart run bin/cotr_cli.dart --uppercase
To set it to false, prefix the full name with “no-”:
dart run bin/cotr_cli.dart --no-uppercase
Finally, if an argument can accept multiple values, use the addMultiOption method:
void main(List<String> arguments) {
  final ArgParser parser = ArgParser()
  ..addMultiOption('names', abbr: 'n');

  ArgResults argResults = parser.parse(arguments);
}
And then pass in multiple values separated by commas:
dart run bin/my_cli.dart -n jack,jill,humpty
Defining Multiple Options
You can use multiple add[Option] methods to add as many options as you’d like to a single ArgParser. For instance:
void main(List<String> arguments) {
  final ArgParser parser = ArgParser()
    ..addOption('name', abbr: 'n')
    ..addFlag('dev', abbr: 'd', defaultsTo: false)
    ..addMultiOption('languages', abbr: 'l');

  ArgResults argResults = parser.parse(arguments);

  bool dev = argResults['dev'];

  if (dev) print('dev');

  stdout.writeln(argResults['name']);
  stdout.writeln(argResults['languages']);
}
Now you can specify all arguments in the same call:
dart run bin/my_cli.dart -n joe -d -l dart,javascript
If there are additional arguments included in the command that do not match an expected option, you can access those using the rest property on the ArgResults object. For example, lets use the same main() function from above but this time our command looks like this:
dart run bin/my_cli.dart -n joe -d -l dart,javascript hello red
We can use the rest property to get the last two arguments which have no corresponding option:
stdout.writeln(argResults.rest); // [hello, red]
The rest property will only capture unhyphenated arguments. If the user adds an unrecognized property name, like “-r” or “—color”, an error will be thrown.
Add Commands
Tha ArgParser looks for two types of user input: options (above) and commands. While options define what type of arguments a user can provide to our app, commands determine what the app will do with the arguments. Each command has its own ArgParser that can be used to define the arguments it expects.
For example, say we have a CLI app that converts a string to all uppercase or lowercase. We accomplish this using just a flag and an input option:
// dart run bin/my_cli.dart -i joe -u
void main(List<String> arguments) {
  final ArgParser parser = ArgParser()
    ..addOption('input', abbr: 'i')
    ..addFlag('uppercase', abbr: 'u');

  ArgResults results = parser.parse(arguments);

  bool uppercase = results['uppercase'];

  if(uppercase){
    stdout.writeln(results['input'].toString().toUpperCase());
  } else {
    stdout.writeln(results['input']);
  }
}
To refactor this app so it uses commands, we can use the addCommand method of ArgParser:
// dart run bin/my_cli.dart uppercase -i joe
void main(List<String> arguments) {
  final ArgParser parser = ArgParser()
    ..addCommand('uppercase', ArgParser()..addOption('input', abbr: 'i'))
    ..addCommand('lowercase', ArgParser()..addOption('input', abbr: 'i'));

  ArgResults results = parser.parse(arguments);

  String? commandName = results.command?.name;

  if (commandName == 'uppercase') {
    stdout.writeln(results.command?['input'].toString().toUpperCase());
  } else if(commandName == 'lowercase') {
    stdout.writeln(results.command?['input']);
  } else {
    stdout.writeln('Command not found');
  }
}
This code is a little hard to follow. Fortunately, the args package offers a cleaner way to set this up using CommandRunner and the Command class. Instead of defining the full command inline, create a separate class for each command and override the name, description, argParser, and run methods:
class Uppercase extends Command {
  @override
  String get description => 'Convert the given string to uppercase';

  @override
  String get name => 'uppercase';

  @override
  ArgParser get argParser {
    return ArgParser()..addOption('input', abbr: 'i', help: 'The string to convert to uppercase.');
  }

  @override
  void run() {
    final input = argResults!['input'] as String?;
    if (input == null) {
      throw UsageException('An input string must be provided.', usage);
    }
    print(input.toUpperCase());
  }
}
Then add this Command class to a CommandRunner in your main() function and call run():
// dart run bin/my_cli.dart uppercase -i joe
void main(List<String> arguments) {
  CommandRunner(
    "my_cli",
    "Dart CLI example",
  )
    ..addCommand(Uppercase())
    ..run(arguments);
}
Using the CommandRunner this way allows your users to view help text by appending “-h” or “—help” to their commands (dart run bin/cotr_cli.dart uppercase -h). If you add commands using the addCommand method, there is no way for you to update the command’s description.
Add Help Text
You can add a short help text to each option you add to an ArgParser.
void main(List<String> arguments) {
  final ArgParser parser = ArgParser()
    ..addOption('name', abbr: 'n', help: 'The name to say hello to.')
    ..addFlag('dev', abbr: 'd', defaultsTo: false, help: 'Whether to run in dev mode.')
    ..addMultiOption('languages', abbr: 'l', help: 'The language(s) to use.');
}
The parser has a usage property that will print each option with its name, abbreviation, and help text. The output of parser.usage for the above code is shown here:
-n, --name         The name to say hello to.
-d, --[no-]dev     Whether to run in dev mode.
-l, --languages    The language(s) to use.
Additional help text can be added to options that accept multiple arguments. For example, we can expand on our languages option above by adding valueHelp, allowed, and allowedHelp properties:
void main(List<String> arguments) {
  final ArgParser parser = ArgParser()
    ..addOption('name', abbr: 'n', help: 'The name to say hello to.')
    ..addFlag('dev', abbr: 'd', defaultsTo: false, help: 'Whether to run in dev mode.')
    ..addMultiOption(
      'languages',
      abbr: 'l',
      help: 'The language(s) to use.',
      allowed: ['Dart', 'Kotlin', 'Java', 'Swift', 'Objective-C'],
      allowedHelp: {
        'Dart': 'Dart is a client-optimized language for fast apps on any platform.',
        'Kotlin': 'Kotlin is a cross-platform, statically typed, general-purpose programming language with type inference.',
        'Java': 'Java is a class-based, object-oriented programming language that is designed to have as few implementation dependencies as possible.',
        'Swift': 'Swift is a general-purpose, multi-paradigm, compiled programming language developed by Apple Inc. for iOS, iPadOS, macOS, watchOS, tvOS, Linux, and z/OS.',
        'Objective-C': 'Objective-C is a general-purpose, object-oriented programming language that adds Smalltalk-style messaging to the C programming language.'
      },
      valueHelp: 'Dart',
    );

  stdout.write(parser.usage);
}
The new help text for the updated argument looks like this:
-n, --name                 The name to say hello to.
-d, --[no-]dev             Whether to run in dev mode.
-l, --languages=<Dart>     The language(s) to use.

          [Dart]           Dart is a client-optimized language for fast apps on any platform.
          [Java]           Java is a class-based, object-oriented programming language that is designed to have as few implementation dependencies as possible.
          [Kotlin]         Kotlin is a cross-platform, statically typed, general-purpose programming language with type inference.
          [Objective-C]    Objective-C is a general-purpose, object-oriented programming language that adds Smalltalk-style messaging to the C programming language.
          [Swift]          Swift is a general-purpose, multi-paradigm, compiled programming language developed by Apple Inc. for iOS, iPadOS, macOS, watchOS, tvOS, Linux, and z/OS
You can also remove an argument from the help text by setting hide to true.
Reading Files
Read a Specific File
You can read the contents of a file using the readAsString() or readAsStringSync() methods:
Future<void> run() async {
    final name = argResults!['name'] as String?;

    if (name == null) {
      throw UsageException('Please provide a file name', usage);
    }

    File file = File(name);

    if (!file.existsSync()) {
      throw UsageException('File does not exist', usage);
    }

    print(file.readAsStringSync());
    print(await file.readAsString());
  }
The openRead() method returns a Stream of bytes which you can convert to a string using the transform method and the utf8 decoder. This is useful for reading large files:
final lines = await file.openRead().transform(utf8.decoder).toList();
Read all Files in a Directory
To loop through the files in a directory, first obtain a reference to the directory:
// Current directory
final Directory directory = Directory.current;

// Specified Directory
final Directory specificDirectory = Directory('lib/src/commands');
Then use the list() method to see all FileSystemEntity objects in the directory:
directory.list().forEach((entity) {
      print('Entity path: ${entity.path}');
      print('Entity type: ${entity.runtimeType}');
      print('Entity is file: ${entity is File}');
      print('Entity is directory: ${entity is Directory}');
});
Writing Files
Write to Specific File
You can write to a file using the writeAsString() or writeAsStringSync() method;. First create a reference to the file you want to write to and then call the method:
// Current Directory
final Directory directory = Directory.current;

final tempDirectory = await directory.createTemp();

final file = File('${tempDirectory.path}/test.dart');

file.writeAsString('Hello CLI');
Create a Directory
You can use the Directory class from dart:io to create and manipulate directories. First create a reference to the directory you want to create. The path always starts at the current directory. Then use the create() method to create the directory:
final Directory directory = Directory('lib/src/commands');

directory.create(recursive: true);
Use the Current Directory
You can use the Directory.current property to get a reference to the current directory.
final currentDirectory = Directory.current;
Then you can add files or subdirectories as described above. To create a temporary subdirectory, use the createTemp() method. Directories can be deleted using the delete() method:
directory.createTemp();
Requesting User Input
You can prompt the CLI user for input using a combination of stdout and stdin.
stdout.write('Enter a name: ');
// read user input
String first = stdin.readLineSync()!;

// print result
print(first);